Linked Lists
An array is a data structure where elements are
stored in consecutive memory locations. In order to occupy the adjacent space,
a block of memory that is required for the array should be allocated before hand. Once the memory is allocated, it cannot be
extended any more. This is why the array is known as a static data structure.
In contrast to this, the linked list is called a dynamic data structure
where the amount of memory required can be varied during its use. In the linked
list, the adjacency between the elements is maintained by means of links or
pointers. A link or pointer actually is the address (memory location) of
the subsequent element. Thus, in a linked list, data (actual content) and link
(to point to the next data) both are required to be maintained. An element in a
linked list is a specially termed node, which can be viewed as shown in
Figure 5.1. A node consists of two fields: DATA (to store the actual
information) and LINK (to point to the next node).

Figure 5.1 Node: an
element in a linked list.
Definition
A linked list is an ordered collection of
finite, homogeneous data elements called nodes where the linear order is
maintained by means of links or pointers.
Depending
on the requirements the pointers are maintained, and accordingly the linked
list can be classified into three major groups: single linked list, circular
linked list, and double linked list.
Single Linked List
In a single linked list each node contains only one
link which points to the subsequent node in the list. Figure 3.2 shows a linked
list with six nodes.
Here, N1,
N2, . . ., N6 are the constituent nodes in
the list. HEADER is an empty node (having data content NULL) and only used to
store a pointer to the first node N1. Thus, if one knows the address of the
HEADER node from the link field of this node, the next node can be traced, and
so on. This means that starting from the first node one can reach to the last node
whose link field does not contain any address but has a null value. Note that
in a single linked list one can move from left to right only; this is why a
single linked list is also called one way list.
Representation of a Linked List
in Memory
There are two ways to represent a linked list in memory:
1. Static
representation using array
2. Dynamic
representation using free pool of storage
Static representation
In static representation of a single linked list,
two arrays are maintained: one array for data and the other for links. The
static representation of the linked list in Figure 5.2 is shown in Figure 5.3.
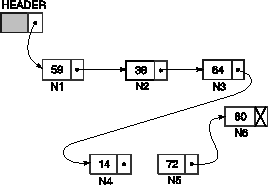
Figure 5.2 A
single linked list with six nodes.
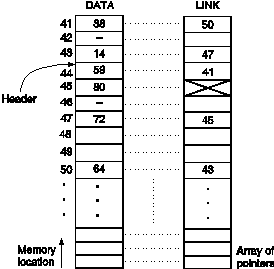
Figure 5.3 Static
representation using arrays of the single linked list of Figure 3.20.
Two
parallel arrays of equal size are allocated which should be sufficient to store
the entire linked list. Nevertheless this contradicts the idea of the linked
list (that is non-contagious location of elements). But in some programming
languages, for example, ALGOL, FORTRAN, BASIC, etc. such a representation is
the only representation to manage a linked list.
Dynamic representation
The efficient way of representing a linked list is
using the free pool of storage. In this method, there is a memory bank
(which is nothing but a collection of free memory spaces) and a memory
manager (a program, in fact). During the creation of a linked list,
whenever a node is required the request is placed to the memory manager; the
memory manager will then search the memory bank for the block requested and, if
found, grants the desired block to the caller. Again, there is also another
program called the garbage collector; it plays whenever a node is
no more in use; it returns the unused node to the memory bank. It may be noted
that memory bank is basically a list of memory spaces which is available to a
programmer. Such a memory management is known as dynamic memory management.
The dynamic representation of linked list uses the dynamic memory management
policy.
The
mechanism of dynamic representation of single linked list is illustrated in
Figures 3.4(a) and 3.4(b). A list of available memory spaces is there
whose pointer is stored in AVAIL. For a request of a node, the list AVAIL is
searched for the block of right size. If AVAIL is null or if the block of
desired size is not found, the memory manager will return a message
accordingly. Suppose the block is found and let it be XY. Then the memory
manager will return the pointer of XY to the caller in a temporary buffer, say
NEW. The newly availed node XY then can be inserted at any position in the
linked list by changing the pointers of the concerned nodes. In Figure 3.4(a), the
node XY is inserted at the end and change of pointers is shown by the dotted
arrows. Figure 3.4(b) explains the mechanism of how a node can be returned from
a linked list to the memory bank.
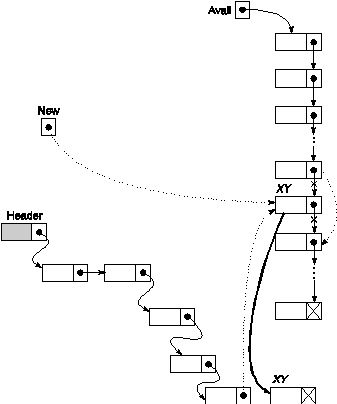
Figure 5.4(a) Allocation of a node from memory bank to a linked list.
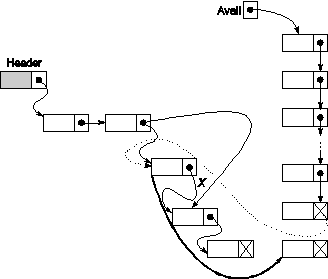
Figure 5.4(b) Returning
a node from a linked list to memory bank.
The
pointers which are required to be manipulated while returning a node are shown with dotted arrows.
Note that such allocations or deallocations are carried out by changing the
pointers only.
Operations on a Single Linked
List
The operations possible on a single linked list are listed below:
● Traversing
the list
● Inserting
a node into the list
● Deleting
a node from the list
● Copying
the list to make a duplicate of it
● Merging
the linked list with another one to make a larger list
● Searching
for an element in the list.
We will assume the following convention in our
subsequent discussions: suppose X is a pointer to a node. The values in the
DATA field and LINK field will be denoted by XDATA and XLINK, respectively. We
will write NULL to imply nil value in the DATA and LINK fields.
Traversing a single linked list
In traversing a single linked list, we visit every node in the list
starting from the first node to the last node. The following is the algorithm Traverse_SL for the same.
Algorithm Traverse_SL
Input: HEADER is the pointer to the header node.
Output: According to the Process( )
Data structures: A single linked list whose address of the starting node is
known from the HEADER.
|
Steps: 1. ptr = HEADER®LINK // ptr is to
store the pointer to a current node 2. While (ptr ¹ NULL) do //
Continue till the last node 3. Process(ptr) // Perform Process(
) on the current node 4. ptr = ptr®LINK // Move to the next node 5. EndWhile 6.
Stop |
Note: A simple operation, namely Process( )
may be devised to print the data content of a node, or count the total number
of nodes, etc.
Inserting a node into a single
linked list
There are various positions where a node can be inserted:
(i) Inserting at the
front (as a first element)
(ii) Inserting at the end (as a last element)
(iii) Inserting
at any other position.
Before we discuss these insertions, let us assume a
procedure GetNode(NODE) to get a pointer of a memory block which suits the
type NODE. The procedure may be defined as follows:
Procedure GetNode
Input: NODE is the type of the data for which a memory has to be
allocated.
Output: Return a message if the allocation fails else the pointer to
the memory block allocated.
|
Steps: 1. If (AVAIL = NULL) //
AVAIL is the pointer to the pool of free storage 2. Return(NULL) 3. Print
“Insufficient memory: Unable to allocate memory” 4. Else //
Sufficient memory is available 5. ptr = AVAIL // Start
from the location, where AVAIL points 6. While
(SizeOf(ptr) ¹ SizeOf(NODE)) and (ptr®LINK
¹ NULL) do // Till the desired block is found
or the search reaches the end of the pool 7. ptr1 = ptr // To keep the track of the
previous block 8. ptr = ptr®LINK // Move to the next block 9. EndWhile 10. If (SizeOf(ptr) = SizeOf(NODE)) //
Memory block of right size is found 11. ptr1®LINK = ptr®LINK // Update the AVAIL list 12. Return(ptr) 13. Else 14. Print
“The memory block is too large to fit” 15. Return(NULL) 16. EndIf 17. EndIf 18. Stop |
Node: The GetNode( ) procedure as defined above is just to understand how a
node can be allocated from the available storage space. In C, C++ and Java,
there is a library routine for doing the same such as alloc(), malloc() (in C, C++), new (in C++, Java).
Inserting a node at the front of a
single linked list
The algorithm InsertFront_SL is used to
insert a node at the front of a single linked list.
Algorithm InsertFront_SL
Input: HEADER is the pointer to the header node and X is
the data of the node to be inserted.
Output: A single linked list with a newly inserted node at the front of
the list.
Data structures: A single linked list whose address of the starting node is known
from the HEADER.
|
Steps: 1. new = GetNode(NODE) // Get a memory block of type NODE
and store its pointer in new 2. If (new = NULL) then // Memory manager returns NULL on searching the memory
bank 3. Print “Memory underflow: No insertion” 4. Exit //
Quit the program 5. Else // Memory
is available and get a node from memory bank 6. new®LINK = HEADER®LINK // Change of pointer 1 as
shown in Figure 3.5(a) 7. new®DATA = X // Copy the data X to
newly availed node 8. HEADER®LINK = new //
Change of pointer 2 as shown in Figure 3.5(a) 9. EndIf 10. Stop |
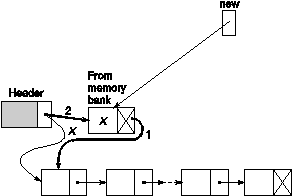
Figure 5.5(a) Inserting
a node in the front of a single linked list.
Inserting a node at the end of a
single linked list
The algorithm InsertEnd_SL is used to
insert a node at the end of a single linked list.
Algorithm InsertEnd_SL
Input: HEADER is the pointer to the header node and X is
the data of the node to be inserted.
Output: A single linked list with a newly inserted node having data X
at the end of the list.
Data structures: A single linked list whose address of the starting
node is known from the HEADER.
|
Steps: 1. new = GetNode(NODE) // Get a memory block of type NODE
and return its pointer as new 2. If (new = NULL) then // Unable to allocate memory for a node 3. Print “Memory is insufficient: Insertion is not
possible” 4. Exit // Quit the program 5. Else // Move to the
end of the given list and then insert 6. ptr = HEADER // Start from the HEADER node 7. While (ptr®LINK
¹ NULL) do //
Move to the end 8. ptr = ptr®LINK // Change pointer to the next
node 9. EndWhile 10. ptr®LINK = new // Change the link field of
last node: 11. new®DATA = X // Copy the content X into
the new node 12. EndIf 13. Stop |
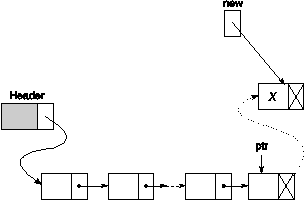
Figure 5.5(b) Inserting
a node at the end of a single linked list.
Inserting a node into a single
linked list at any position in the list
The algorithm InsertAny_SL is used to
insert a node into a single linked list at any position in the list.
Algorithm InsertAny_SL
Input: HEADER is the pointer to the header node, X is the
data of the node to be inserted, and KEY being the data of the key node
after which the node has to be inserted.
Output: A single linked list enriched with newly inserted node having data
X after the node with data KEY.
Data structures: A single linked list whose address of the starting node is known
from the HEADER.
|
Steps: 1. new = GetNode(NODE) //
Get a memory block of type NODE and 2. If (new = NULL) then //
Unable to allocate memory for a node 3. Print “Memory is insufficient: Insertion is not
possible” 4. Exit // Quit the program 5. Else 6. ptr = HEADER //Start
from the HEADER node 7. While (ptr®DATA
¹ KEY) and (ptr®LINK
¹ NULL) do //
Move to the node 8. ptr = ptr®LINK 9. EndWhile 10. If (ptr®LINK = NULL) then // Search fails to find the KEY 11. Print “KEY is not available in the list” 12. Exit 13. Else 14. new®LINK = ptr®LINK // Change the pointer 1 as shown in
Figure 3.5(c) 15. new®DATA = X // Copy the content into
the new node 16. ptr®LINK = new // Change the pointer 2 as
shown in Figure 3.5(c) 17. EndIf 18. EndIf 19. Stop |
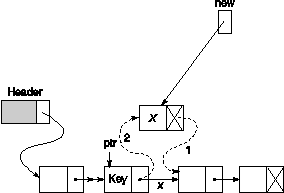
Figure 5.5(c) Inserting
a node at any position in a single linked list.
Deleting a node from a single linked
list
Like insertions, there are also three cases of deletions:
(i) Deleting from the
front of the list
(ii) Deleting from the end of the list
(iii) Deleting from any position in the list
Let us
consider the procedure for various cases of deletion. We will assume a
procedure, namely ReturnNode(ptr) which returns a node
having pointer ptr to the free pool of
storage. The procedure ReturnNode(ptr) is defined as
follows:
Procedure ReturnNode
Input: PTR is the pointer of a node to be returned to a list
pointed by the pointer AVAIL.
Output: The node is inserted into the list AVAIL at the end.
|
Steps: 1. ptr1 = AVAIL // Start from
the beginning of the free pool 2. While (ptr1®LINK ¹ NULL) do 3. ptr1 = ptr1®LINK 4. EndWhile 5. ptr1®LINK = PTR
// Insert the node at the end 6. PTR®LINK = NULL
// Node inserted is the last node 7. Stop |
Note: The
procedure ReturnNode( ) inserts the free node at the end of the pool of free
storage whose header address is AVAIL. Alternatively, we can insert the
free node at the front or at any position of the AVAIL list which is
left as an exercise for the student. In C and C++ this procedure is realized as
a library routine free().
Deleting the node at the front of a
single linked list
The algorithm DeleteFront_SL is used to
delete the node at the front of a single linked list. Such a deletion operation
is explained in Figure 3.6(a).
Algorithm DeleteFront_SL
Input: HEADER is the pointer to the header node.
Output: A single linked list after eliminating the node at the front
of the list.
Data structures: A single linked list whose address of the starting node is
known from the HEADER.
|
Steps: 1. ptr = HEADER®LINK // Pointer to the first
node 2. If (ptr = NULL) then //
If the list is empty 3. Print “The list is empty: No deletion” 4. Exit // Quit
the program 5. Else // The list
is not empty 6. ptr1 = ptr®LINK // ptr1 is
the pointer to the second node, if any 7. HEADER®LINK = ptr1 // Next node becomes the
first node // as in Figure 3.6(a) 8. ReturnNode(ptr) //
Deleted node is freed to the memory bank for future use 9. EndIf 10. Stop |

Figure 5.6(a) Deleting
the node at the front of a single linked list.
Deleting the node at the end of a
single linked list
The algorithm DeleteEnd_SL is used to
delete the node at the end of a single linked list. This is shown in Figure
3.6(b).
Algorithm DeleteEnd_SL
Input: HEADER is the pointer to the header node.
Output: A single linked list after eliminating the node at
the end of the list.
Data structures: A single linked list whose address of the starting node is
known from the HEADER.
|
Steps: 1. ptr = HEADER
// Move from the header node 2. If (ptr®LINK = NULL) then 3. Print “The list is empty: No deletion possible” 4. Exit
// Quit the
program 5. Else 6. While (ptr®LINK
¹ NULL) do // Go
to the last node 7. ptr1 = ptr
// To store the previous pointer 8. ptr = ptr®LINK
// Move to the next 9. EndWhile 10. ptr1®LINK = NULL
// Last but one node becomes the last node as in Figure 3.6(b) 11. ReturnNode(ptr) //
Deleted node is returned to the memory bank for future use 12. EndIf 13. Stop |
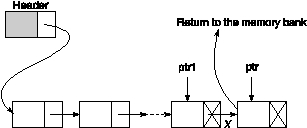
Figure 3.6(b) Deleting
the node at the end of a single linked list.
Deleting the node from any position
of a single linked list
The algorithm DeleteAny_SL is used to
delete a node from any position in a single linked list. This is illustrated in
Figure 3.6(c).
Algorithm DeleteAny_SL
Input: HEADER is the pointer to the header node, KEY is the
data content of the node to be deleted.
Output: A single linked list except the node with data content as KEY.
Data structures: A single linked list whose address of the starting node is
known from the HEADER.
|
Steps: 1. ptr1 = HEADER // Start
from the header node 2. ptr = ptr1®LINK // This
points to the first node, if any 3. While (ptr ¹ NULL) do 4. If (ptr®DATA ¹ KEY) then // If
not found the key 5. ptr1 = ptr // Keep a track
of the pointer of the previous node 6. ptr = ptr®LINK // Move to the next 7. Else 8. ptr1®LINK = ptr®LINK // Link field of the predecessor is to
point the
// successor of node under deletion, see Figure 3.6(c) 9. ReturnNode(ptr) // Return the deleted node to the
memory bank 10. Exit // Exit
the program 11. EndIf 12. EndWhile 13. If (ptr = NULL) then // When the desired node is
not available in the list 14. Print “Node with KEY does not exist: No
deletion” 15. EndIf 16. Stop |
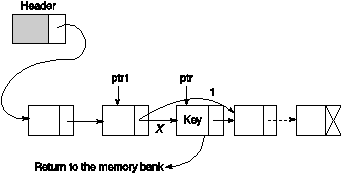
Figure 3.6(c) Deleting
a node from any position of a single linked list.
Copying a single linked list
For a given list we can copy it into another list
by duplicating the content of each node into the newly allocated node. The
following is an algorithm to copy an entire single linked list.
Algorithm Copy_SL
Input: HEADER is the pointer to the header node of the list.
Output: HEADER1 is the pointer to the duplicate list.
Data structures: Single linked list structure.
|
Steps: 1. ptr = HEADER //
Current position in the master list 2. HEADER1 = GetNode(NODE) // Get a node for the
header of the duplicate list 3. ptr1 = HEADER1 // ptr1 is
the current position in the duplicated list 4. ptr1®DATA = NULL //
Header node does not contain any data 5. While (ptr ¹ NULL) do //
Till the traversal of master node is finished 6. new = GetNode(NODE) //
Get a new node from memory bank 7. new®DATA = ptr®DATA //
Copy the content 8. ptr1®LINK = new //
Insert the node at the end of the duplicate list 9. new®LINK = NULL 10. ptr1 = new 11. ptr = ptr®LINK //
Move to the next node in the master list 12. EndWhile 13. Stop |
Merging two single linked lists into
one list
Suppose two single linked lists, namely L1 and L2
are available and we want to merge the list L2 after L1. Also assume that, HEADER1
and HEADER2 are the header nodes of the lists L1 and L2, respectively.
Merging can be done by setting the pointer of the link field of the last node
in the list L1 with the pointer of the first node in L2. The header node in the
list L2 should be returned to the pool of free storage. Merging two single
linked lists into one list is illustrated in Figure 5.7.
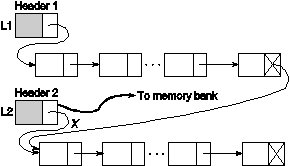
Figure 5.7 Merging
two single linked lists into one single linked list.
Following
is the algorithm Merge_SL to merge two single
linked lists into one single linked list:
Algorithm Merge_SL
Input: HEADER1 and HEADER2 are the pointers to the
header nodes of lists (L1 and L2, respectively) to be merged.
Output: HEADER is the pointer to the resultant list.
Data structures: Single linked list structure.
|
Steps: 1. ptr = HEADER1 2. While (ptr®LINK ¹ NULL) do //
Move to the last node in the list L1 3. ptr = ptr®LINK 4. EndWhile 5. ptr®LINK = HEADER2®LINK // Last
node in L1 points to the first node in L2 6. ReturnNode(HEADER2) // Return the
header node to the memory bank 7. HEADER = HEADER1 //
HEADER becomes the header node of the merged list 8.
Stop |
Searching for an element in a single
linked list
The algorithm Search_SL( ) is given below to search an item in a single linked
list.
Algorithm Search_SL
Input: Key, the item to be searched.
Output: Location,
the pointer to a node where the KEY belongs to or an error message.
Data structures: A single linked list whose address of the starting node is
known from HEADER.
|
Step: 1. ptr = Header®Link //
Start from the first node 2. flag = 0, Location =
Null 3. While (ptr ¹ NULL) and (flag = 0) do 4. If (ptr®DATA
= KEY) then 5. flag = 1 //
Search is finished 6. Location
= ptr 7. Print “Search is successful” 8. Return (Location) 9. Else 10. ptr = ptr®LINK //
Move to the next node 11. EndIf 12. EndWhile 13. If (ptr = NULL) then 14. Print “Search is unsuccessful” 15. EndIf 16.
Stop |
Circular Linked List
In our previous discussion, we have noticed that in
a single linked list, the link field of the last node is null (hereafter a
single linked list may be read as ordinary linked list), but a number of
advantages can be gained if we utilize this link field to store the pointer of
the header node. A linked list where the last node points the header node is
called the circular linked list. Figure 5.8 shows a pictorial
representation of a circular linked list.
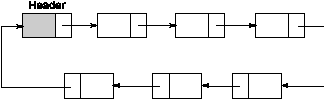
Figure 5.8 A
circular linked list.
Circular linked
lists have certain advantages over ordinary linked lists. Some advantages of
circular linked lists are discussed below:
Accessibility of a member node in
the list
In an ordinary list, a member node is accessible
from a particular node, that is, from the header node only. But in a circular
linked list, every member node is accessible from any node by merely chaining
through the list.
Example: Suppose, we are manipulating some information which
is stored in a list. Also, think of a case where for a given data, we want to
find the earlier occurrence(s) as well as post occurrence(s). Post
occurrence(s) can be traced out by chaining through the list from the current
node irrespective of whether the list is maintained as a circular linked or an
ordinary linked list.
In order
to find all the earlier occurrences, in case of ordinary linked lists, we have
to start our traversing from the header node at the cost of maintaining the
pointer for the header in addition to the pointers for the current node and
another for chaining. But in the case of a circular linked list, one can trace
out the same without maintaining the header information, rather maintaining
only two pointers. Note that in ordinary linked lists, one can chain through
left to right only whereas it is virtually in both the directions for circular
linked lists.
Null link problem
The null value in the link field may create some problem during the
execution of programs if proper care is not taken. This is illustrated below by
mentioning two algorithms to perform search on ordinary linked lists and
circular linked lists.
Algorithm Search_SL
Input: KEY the item to be searched.
Output: Location, the pointer to a node where KEY belongs or
an error message.
Data structures: A single linked list whose address of the starting node is
known from the HEADER.
|
Steps: 1. ptr = HEADER®LINK 2. While (ptr ¹ NULL) do 3. If (ptr®DATA ¹ KEY) then 4. ptr = ptr®LINK 5. Else 6. Print “Search is successful” 7. Return(ptr) 8. EndIf 9. EndWhile 10. If (ptr = NULL) then 11. Print “The entire list has traversed but KEY is not
found” 12. EndIf 13. Stop |
Note that in the algorithm Search_SL,
two tests in step 2 (which control the loop of searching) cannot be placed
together as While (ptr ¹ NULL) AND (ptr®DATA ¹ KEY) do because
in that case there will be an execution error for ptr®DATA since it is not defined when ptr
= NULL. But with a circular linked list very simple implementation is possible
without any special care for the NULL pointer. As an illustration the searching
of an element in a circular linked list is given below:
Algorithm Search_CL
Input: KEY the item of search.
Output: Location, the pointer to a node where KEY belongs or
an error message.
Data structures: A circular linked list whose address to the starting node
is known from the HEADER.
|
Steps: 1. ptr = HEADER®LINK 2. While (ptr®DATA ¹ KEY) and (ptr ¹ HEADER) do 3. ptr = ptr®LINK
4. EndWhile 5. If (ptr®DATA = KEY) 6. Return (ptr) 7. Else 8. Print “Entire list is searched: KEY node is not
found” 9. EndIf 10. Stop |
Some easy-to-implement operations
Some operations can more easily be implemented with a circular linked
list than with an ordinary linked list. Operations like merging
(concatenation), splitting (decatenation), deleting, disposing of an entire
list, etc. can easily be performed on circular linked list. The merging
operation, as in Figure 5.9, is explained in the algorithm Merge_CL
as follows:
Algorithm Merge_CL
Input: HEADER1 and HEADER2 are the two pointers to
header nodes.
Output: A larger circular linked list containing all the nodes from lists HEADER1
and HEADER2.
Data
structures: Circular
linked list structure.
|
Steps: 1. ptr1 = HEADER1®LINK 2. ptr2 = HEADER2®LINK 3. HEADER1®LINK = ptr2 //
Pointer assignment 1 (Figure 3.9) 4. While (ptr2®LINK ¹ HEADER2) do //
Move to the node just preceding the node HEADER2 5. ptr2 = ptr2®LINK 6. EndWhile 7. ptr2®LINK = ptr1 //
Pointer assignment 2 (Figure 3.9) 8. ReturnNode(HEADER2) // Return the
HEADER2 to the free storage pool 9. Stop |
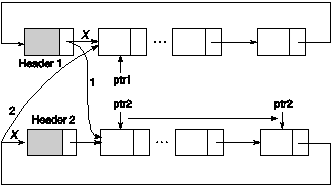
Figure 5.9 Concatenation of two circular linked lists.
One can
easily compare the algorithm Merge_CL with the
algorithm Merge_SL. In the algorithm Merge_SL, the entire list is needed to be traversed
in order to locate the last node, which is not required in the algorithm Merge_CL. This implies that Meger_CL
works faster than Merge_SL.
Circular
linked lists have some disadvantages as well. One main disadvantage is that
without adequate care in processing, it is possible to get trapped into an
infinite loop! This problem occurs when we are unable to detect the end of the
list while moving from one node to the next. To get rid of this problem, we
have to maintain a special node whose data content is possibly NULL, as such a
node does not contain any valid information, so it is nothing but just a
wastage of memory space.
Double Linked Lists
In a single linked list one can move beginning from
the header node to any node in one direction only (from left to right). This is
why a single linked list is also termed a one-way list. On the other
hand, a double linked list is a two-way list because one can move in
either direction, either from left to right or from right to left. This is
accomplished by maintaining two link fields instead of one as in a single
linked list. A structure of a node for a double linked list is represented as
in Figure 5.10.
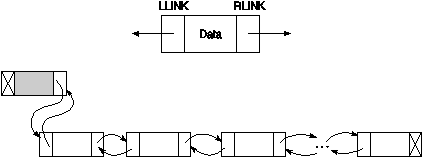
Figure 5.10 Structure
of a node and a double linked list.
From the figure, it can be noticed that two links,
viz. RLINK and LLINK, point to the nodes on the right side and left side of the
node, respectively. Thus, every node, except the header node and the last node,
points to its immediate predecessor and immediate successor.
Operations on a Double Linked
List
All the operations as mentioned for a single linked
list can be implemented more efficiently using a double linked list. In this
section, only the insertion and deletion operations are discussed. Other
operations like traversing, copying, merging, etc. are kept for the reader as
exercises.
Inserting a node into a double
linked list
Figure 5.11 shows a schematic representation of
various cases of inserting a node into a double linked list. Let us consider
the algorithms of various cases of insertion.
Inserting a node in the front
The algorithm InsertFront_DL is used to
define the insertion operation in a double linked list.
Algorithm InsertFront_DL
Input: X is the data content of the node to be inserted.
Output: A double linked list enriched with a node in the front
containing data X.
Data structure: Double linked list structure whose pointer to the header
node is the HEADER.
|
Steps: 1. ptr = HEADER®RLINK //
Points to the first node 2. new = GetNode(NODE) //
Avail a new node from the memory bank 3. If (new ¹ NULL) then //
If new node is available 4. new®LLINK = HEADER // Newly inserted node points the
header as 1 in Figure 3.11(a) 5. HEADER®RLINK = new //
Header now points to then new node as 2 in Figure 3.11(a) 6. new®RLINK = ptr // See the
change in pointer shown as 3 in Figure 3.11(a) 7. ptr®LLINK = new // See the
change in pointer shown as 4 in Figure 3.11(a) 8. new®DATA = X //
Copy the data into the newly inserted node 9. Else 10. Print “Unable to allocate memory: Insertion is
not possible” 11. EndIf 12. Stop |
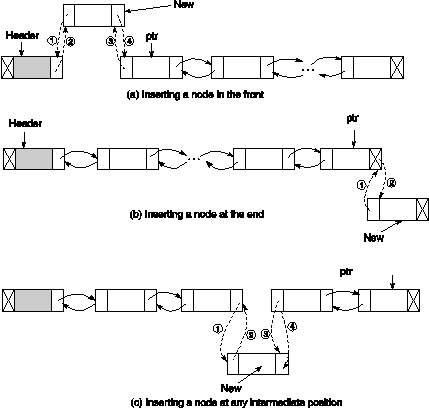
Figure 5.11 Inserting
a node at various positions in a double linked list.
Inserting a node at the end
The algorithm InsertEnd_DL is to insert
a node at the end into a double linked list.
Algorithm InsertEnd_DL
Input: X is the data content of the node to be inserted.
Output: A double linked list enriched with a node containing data X
at the end of the list.
Data structure: Double linked list structure whose pointer to the
header node is the HEADER.
|
Steps: 1. ptr = HEADER 2. While (ptr®RLINK ¹ NULL) do //
Move to the last node 3. ptr = ptr®RLINK 4. EndWhile 5. new = GetNode(NODE) //
Avail a new node 6. If (new ¹ NULL) then //
If the node is available 7. new®LLINK = ptr // Change the
pointer shown as 1 in Figure 3.11(b) 8. ptr®RLINK = new // Change the
pointer shown as 2 in Figure 3.11(b) 9. new®RLINK = NULL //
Make the new node as the last node 10. new®.DATA = X //
Copy the data into the new node 11. Else 12. Print “Unable to allocate memory: Insertion is not
possible” 13. EndIf 14. Stop |
Inserting a node at any position in
the list
The algorithm InsertAny_DL is used to
insert a node at any position into a double linked list.
Algorithm InsertAny_DL
Input: X is the data content of the node to be inserted, and
KEY the data content of the node after which the new node is to be
inserted.
Output: A double linked list enriched with a node containing data X
after the node with data KEY, if KEY is not present in the list
then it is inserted at the end.
Data structure: Double linked list structure whose pointer to the header
node is the HEADER.
|
Steps: 1. ptr = HEADER 2. While (ptr®DATA ¹ KEY) and (ptr®RLINK ¹ NULL) //
Move to the key node if the //
current node is not the KEY node or if the list reaches the end 3. ptr = ptr®RLINK 4. EndWhile 5. new = GetNode(NODE) //
Get a new node from the pool of free storage 6. If (new = NULL) then //
When the memory is not available 7. Print (Memory is not available) 8. Exit //
Quit the program 9. EndIf 10. If (ptr®RLINK = NULL) then //
If the KEY is not found in the list 11. new®LLINK = ptr 12. ptr®RLINK = new //
Insert at the end 13. new®RLINK = NULL 14. new®DATA = X //
Copy the information to the newly inserted node 15. Else // The KEY
is available 16. ptr1 = ptr®RLINK //
Next node after the key node 17. new®LLINK = ptr //
Change the pointer shown as 2 in Figure 3.11(c) 18. new®RLINK = ptr1 //
Change the pointer shown as 4 in Figure 3.11(c) 19. ptr®RLINK = new //
Change the pointer shown as 1 in Figure 3.11(c) 20. ptr1®LLINK = new //
Change the pointer shown as 3 in Figure 3.11(c) 21. ptr = new //
This becomes the current node 22. new®DATA = X //
Copy the content to the newly inserted node 23. EndIf 24. Stop |
Note: Observe that the algorithm InsertAny_DL will
insert a node even the key node
does not exist. In that case, the node will be inserted at the end of the list.
Also, note that the algorithm will work even if the list is empty.
Deleting a node from a double linked
list
Deleting a node from a double linked list may take
place from any position in the list, as shown in Figure 5.12. Let us consider
each of those cases separately.
Deleting a node from the front of a
double linked list
The algorithm DeleteFront_DL is defined
below to delete a node from the front end of a double liked list.
Algorithm DeleteFront_DL
Input: A double linked list with data.
Output: A reduced double linked list.
Data structure: Double linked list structure whose pointer to the header node
is the HEADER.
|
Steps: 1. ptr = HEADER®RLINK //
Pointer to the first node 2. If (ptr = NULL) then //
If the list is empty 3. Print “List is empty: No deletion is made” 4. Exit 5. Else 6. ptr1 = ptr®RLINK //
Pointer to the second node 7. HEADER®RLINK = ptr1 //
Change the pointer shown as 1 in Figure 3.12(a) 8. If (ptr1 ¹ NULL) // If the
list contains a node after the first node of deletion 9. ptr1®LLINK =
HEADER //
Change the pointer shown as 2 in Figure 3.12(a) 10. EndIf 11. ReturnNode (ptr)
// Return the deleted node to the memory bank 12. EndIf 13. Stop |
Note that the algorithm DeleteFront_DL
works even if the list is empty.
Deleting a node at the end of a
double linked list
The algorithm is as follows:
Algorithm DeleteEnd_DL
Input: A double linked list with data.
Output: A reduced double linked list.
Data structure: Double linked list structure whose pointer to the header
node is the HEADER.
|
Steps: 1. ptr = HEADER 2. While (ptr®RLINK ¹ NULL) do //
Move to the last node 3. ptr = ptr®RLINK 4. EndWhile 5. If (ptr = HEADER) then //
If the list is empty 6. Print “List is empty: No deletion is made” 7. Exit //
Quit the program 8. Else 9. ptr1 = ptr®LLINK //
Pointer to the last but one node 10. ptr1®RLINK = NULL //
Change the pointer shown as 1 in Figure 3.12(b) 11. ReturnNode (ptr) //
Return the deleted node to the memory bank 12. EndIf 13. Stop |
Deleting a node from any position in
a double linked list
The algorithm is as follows:
Algorithm DeleteAny_DL
Input: A double linked list with data, and KEY, the data
content of the key node to be deleted.
Output: A double linked list without a node having data
content KEY, if any.
Data structure: Double linked list structure whose pointer to the header
node is the HEADER.
|
Steps: 1. ptr = HEADER®RLINK //
Move to the first node 2. If (ptr = NULL) then 3. Print “List is empty: No deletion is made” 4. Exit 5. EndIf // Quit the program 6. While (ptr®DATA ¹ KEY) and (ptr®RLINK ¹ NULL) do //
Move to the desired node 7. ptr = ptr®RLINK 8. EndWhile 9. If (ptr®DATA = KEY) then //
If the node is found 10. ptr1 = ptr®LLINK //
Track the predecessor node 11. ptr2 = ptr®RLINK //
Track the successor node 12. ptr1®RLINK = ptr2 //
Change the pointer shown as 1 in Figure 3.12(c) 13. If (ptr2 ¹ NULL) then //
If the deleted node is the last node 14. ptr2®LLINK =
ptr1 //
Change the pointer shown as 2 in Figure 3.12(c) 15. EndIf 16. ReturnNode(ptr) //
Return the free node to the memory bank 17. Else 18. Print “The node does not exist in the given list” 19. EndIf 20. Stop |
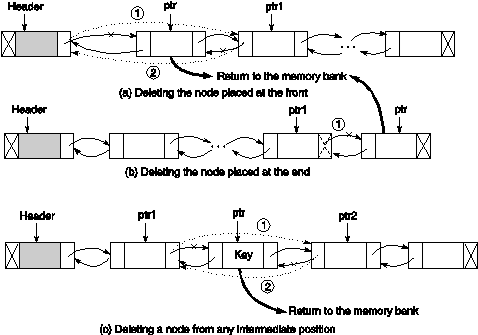
Figure 5.12 Deleting
a node from various positions in a double linked list.
Circular Double Linked List
The advantages of both double linked list and
circular linked list are incorporated into another type of list structure
called circular double linked list and it is known to be the best of its kind.
Figure 5.13 shows a schematic representation of a circular double linked list.
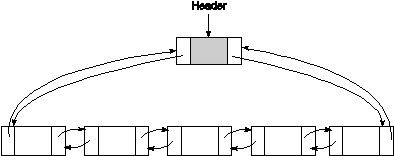
Figure 5.13 A
circular double linked list.
Here,
note that the RLINK (right link) of the rightmost node and LLINK (left link) of
the leftmost node contain the address of the header node; again the RLINK and
LLINK of the header node contain the address of the rightmost node and the
leftmost node, respectively. An empty circular double linked list is
represented as shown in Figure 5.14. In case of an empty list, both LLINK and
RLINK of the header node point to itself.

Figure 5.14 An
empty circular double linked list.
Operations on Circular Double
Linked List
All the regular operations like inserting,
deleting, traversing, searching, merging, splitting, disposing, etc. can be
implemented very easily with a circular linked list. Implementations of the
said operations are left as an exercise for the reader. Here, only the sorting
operation is illustrated.
Sorting operation with a circular
double linked list
The algorithm Sort_CDL shows the
sorting of elements stored in a circular double linked list.
Algorithm Sort_CDL( )
Input: A circularly double linked with elements.
Output: Sorted version of the circularly double linked list.
Data structures: Circular double linked list structure with HEADER
being the pointer to the header node.
|
Steps: 1. ptrBeg = HEADER®LLINK //
Pointer to the first node—the beginning node 2. ptrEnd = HEADER®RLINK //
Pointer to the last node — the ending node 3. While (ptrBeg ¹ ptrEnd) do // To traverse
the entire list — outer loop 4. ptr1 = ptrBeg // ptr1 and ptr2 are two variable pointers 5. ptr2 = ptr1®RLINK
6. While (ptr2 ¹ ptrEnd) do //
For compare and interchange — inner loop 7. If Order(ptr1®DATA, ptr2®DATA) = FALSE then 8. Swap (ptr1, ptr2) //
Interchange the data content at ptr1 and ptr2 9. EndIf 10. ptr1 = ptr1®RLINK //
Move the first pointer to the next 11. ptr2 = ptr2®RLINK //
Move the second pointer to the next 12. EndWhile 13. ptrEnd = ptrEnd®LLINK //
Rightmost node is now sorted out 14. EndWhile 15. Stop |
In the above algorithm, we have assumed the
procedure Order(data1, data2) to
test whether two data are in a desired order or not; it will return TRUE if
they are in order else FALSE. We also assume another procedure Swap(ptr1, ptr2) to interchange the
data content at the nodes pointed by the pointers ptr1 and ptr2.
These procedures are simple to implement and their implementation is left to
students.
The above
algorithm uses the bubble sorting technique. The execution of each outer loop
bubbles up the largest node towards the right end of sorting (say, in ascending
order) and each inner loop is used to compare the successive nodes and push up
the largest towards the right if they are not in order. Figure 3.15 illustrates
the sorting procedure. Students may see whether the algorithm Sort_CDL is also applicable to the double linked
list data structure or not.
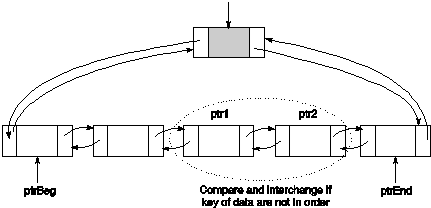
Figure 5.15 Sorting
operation and use of various pointers.
Applications of Linked Lists
In order to store and process data, linked lists
are very popular data structures. These types of data structures hold certain
advantages over arrays. First, in the case of an array, data are stored in
contiguous memory locations, so insertion and deletion operations are quite
time-consuming. In insertion we have to make room for the new element at a
desired location by shifting down the trailing elements; similarly, in case of
deletion, in order to fill the location of the deleted element, all the
trailing elements are required to shift upwards. But, in linked lists, it is a
matter of only change in pointers. Second, an array is based on the static
allocation of memory: the amount of memory required for an array must be known
before hand, once it is allocated we cannot expand its size. This is why for an
array, the general practice is to allocate memory, which is much more than the
memory that actually will be used. But this is simply a wastage of memory
space. This problem is not there in linked lists. A linked list uses a dynamic
memory management scheme; memory allocation is decided during the run-time as
and when required. Also if a memory is no more required, it can be returned to
the free storage space, so that any other module or program can utilize it.
Third, a program using an array may not execute itself even though the memory
required for the data is available, but not in contiguous locations rather
dispersed. As link structures do not necessarily require to have data stored in
adjacent memory locations, so the program of that kind, using linked lists can
then be executed.
However,
there are of course some disadvantages: one is the pointer business. Pointers,
if not managed carefully, may lead to serious errors in execution. Next, linked
lists consume more space than the space required for actual data as we have to
maintain the links among the nodes. Frankly speaking, these drawbacks are
insignificant compared to gains achieved. This is why the use of this structure
is preferred, wherever it is required to manipulate data. In the next few
sections, we illustrate how linked lists can be applied in various
applications.
Sparse Matrix Manipulation
During the discussion on sparse matrices, it was
mentioned that linked lists are the best solution to store matrices. Let us
first decide what should be the node structure so that using that kind of node
we can represent any sparse matrix. Figure 5.16 shows a node structure for the
same.
In Figure
5.16, the fields i and j store the row
and column numbers for a matrix element, respectively. DATA field stores the
matrix element at the ith row and the jth column, i.e. aij. The ROWLINK points the next node in the same row
and COLLINK points the next node in the same column. The principle is that all
the nodes particularly in a row (column) are circular linked with each other;
each row (column) contains a header node. Thus, for a sparse matrix of order m
× n, we have to maintain m headers for all rows and n
headers for all columns, plus one extra node the use of which would be evident
from Figure 3.17(b). For an illustration, a sparse matrix of order 6 × 5 is
assumed, as shown in Figure 3517(a).
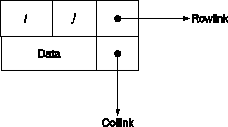
Figure 5.16 Structure
of a node to represent sparse matrices.
Figure 5.17(b)
describes the representation of a sparse matrix. Here, CH1, CH2, ..., CH5 are the 5 headers heading 5 columns and RH1, RH2,
..., RH6 are the 6 headers heading 6 rows. HEADER is one additional header node
keeping the starting address of the sparse matrix. Carefully observe the links
among various nodes and compare them with the sparse matrix assumed.
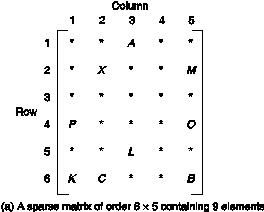
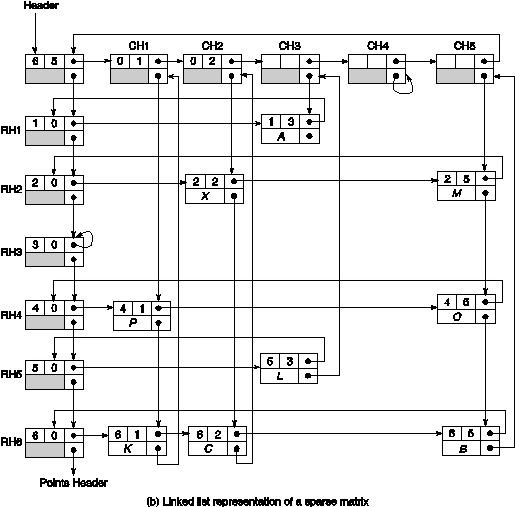
Figure 5.17 A
sparse matrix and its linked list representation.
Polynomial Representation
An important application of linked lists is to
represent polynomials and their manipulations. The main advantage of a linked
list for polynomial representation is that it can accommodate a number of
polynomials of growing sizes so that their combined size does not exceed the
total memory available. The methodology of representing polynomials and the
operations on them are discussed in this section. First, let us consider the case
of representation of polynomials.
Polynomial having a single variable
Let us consider the general form of a polynomial
having a single variable:
where is a term in the polynomial so that ai is a
non-zero coefficient and ei is the
exponent. we will assume an
ordering of the terms in the polynomial such that en > en–1 > ...
> e2 > e1 ³ 0. The structure of a node in order to represent a term can be decided
as shown below:
![]()
Considering
the single linked list representation, a node should have three fields: COEFF
(to store the coefficient ai), EXP (to store the exponent ei) and a LINK (to store the pointer to the next node representing the
next term). It is evident that the number of nodes required to represent a
polynomial is the same as the number of terms in the polynomial. An additional
node may be considered for a header. As an example, let us consider that the
single linked list representation of the polynomial P(x) = 3x8 – 7x6 + 14x3 + 10x
– 5 would be stored as shown in Figure 5.18.
![]()
Figure 5.18 Linked list
representation of a polynomial (single variable).
Note that the terms whose coefficients are zero are
not stored here. Next let us consider two basic operations, namely the addition
and multiplication of two polynomials using this representation.
Polynomial addition
In order to add two polynomials, say P and Q, to get a resultant
polynomial R, we have to compare their terms starting at their first nodes and
moving towards the end one by one. Two pointers Pptr
and Qptr are used to move along the terms of P and Q.
There may arise three cases during the comparison between the terms of two
polynomials.
(i) Case 1: The exponents of
two terms are equal. In this case the coefficients in the two nodes are added
and a new term is created with the values
Rptr®COEFF
= Pptr®COEFF + Qptr®COEFF
and
Rptr®EXP
= Pptr®EXP
(ii) Case
2: Pptr®EXP > Qptr®EXP,
i.e. the exponent of the current term in P is greater than the exponent of the
current term in Q. Then, a duplicate of the current term in P is created and
inserted in the polynomial R.
(iii) Case
3: Pptr®EXP < Qptr®.EXP, i.e. the case when the exponent of the current term in P is less
than the exponent of the current term in Q. In this case, a duplicate of the
current term of Q is created and inserted in the polynomial R.
Polynomial multiplication
Suppose, we have to multiply two polynomials P and
Q so that the result will be stored in R, another polynomial. The method is
quite straightforward: let Pptr denote the current
term in P and Qptr be that of in Q. For each term of
P we have to visit all the terms in Q; the exponent values in two terms are
added (R®EXP = P®EXP + Q®EXP), the coefficient values are multiplied (R®COEFF = P®COEFF × Q®COEFF),
and these values are included into R in such a way that if there is no term in
R whose exponent value is the same as the exponent value obtained by adding the
exponents from P and Q, then create a new node and insert it to R with
the values so obtained (that is, R®COEFF,
and R®EXP); on the other hand, if a node is found in R
having same exponent value R®EXP, then update the coefficient value of it by
adding the resultant coefficient (R®COEFF)
into it.
Polynomials having multiple
variables
So far we have considered the case of a polynomial
of a single variable. The idea now can be extended to represent any polynomial
with two variables, three variables, and so on. Below is a structure of a node
that will be suitable to represent a polynomial with three variables x, y
and z using a single linked list.
![]()
Writing procedures to manipulate such polynomials
is as simple as the earlier procedures for polynomials with single variables.
These are left as an assignment to the reader.
The LinkedList class
The LinkedList class is another class member in the Java Collections Framework to support sequential access of a list of items unlike ArrayList, which provides indexed access. The class hierarchy of the LinkedLust class is shown in Fig. 5.19. It inherits the AbstractSequentialList class and implements the List and Deque interfaces.
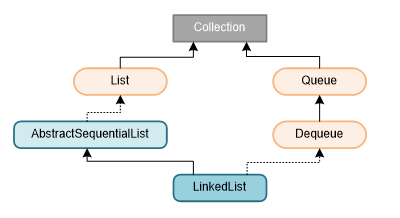
Figure 5.19: The class implementation hierarchy of LinkedList class
Following are the few salient features of this collection.
·
It provides a linked-list data
structure
·
The class can contain duplicate elements.
·
The class uses a doubly linked
list to store the elements.
·
The class maintains insertion order.
·
The class is non-synchronized.
·
In Java LinkedList class, manipulation is fast
because no shifting needs to occur.
·
Java LinkedList class can be used as a list,
stack or queue.
Constructors in the LinkedList class
The LinkedList class consists of two constructors, which are
summarized in Table 5.1.
|
Constructor |
Description |
|
LinkedList() |
It is used to create an empty
list. |
|
LinkedList(Collection<?
extends E> c) |
It is used to construct a list
containing the elements of the specified collection. The ordering of the
element in the list and collection is same. |
Table 5.1:
Constructors in LinkedList class
Methods in the LinkedList class
A large number of methods are there in the class LinkedList, which
are briefly mentioned in Table 5.2.
|
Method |
Description |
|
boolean add(E e) |
It is used to append the
specified element to the end of a list. |
|
void add(int index, E element) |
It is used to insert the
specified element at the specified position index in a list. |
|
boolean addAll(Collection<?
extends E> c) |
It is used to append all of the
elements in the specified collection to the end of this list, in the order that
they are returned by the specified collection's iterator. |
|
boolean addAll(int
index, Collection<? extends E> c) |
It is used to append all the
elements in the specified collection, starting at the specified position of
the list. |
|
void addFirst(E
e) |
It is used to insert the given
element at the beginning of a list. |
|
void addLast(E
e) |
It is used to append the given
element to the end of a list. |
|
void clear() |
It is used to remove all the
elements from a list. |
|
Object clone() |
It is used to return a shallow
copy of an ArrayList. |
|
boolean contains(Object o) |
It is used to return true if a
list contains a specified element. |
|
Iterator<E> descendingIterator() |
It is used to return an iterator
over the elements in a deque in reverse sequential order. |
|
E element() |
It is used to retrieve the first
element of a list. |
|
E get(int index) |
It is used to return the element
at the specified position in a list. |
|
E getFirst() |
It is used to return the first
element in a list. |
|
E getLast() |
It is used to return the last
element in a list. |
|
int indexOf(Object
o) |
It is used to return the index
in a list of the first occurrence of the specified element, or -1 if the list
does not contain any element. |
|
int lastIndexOf(Object
o) |
It is used to return the index
in a list of the last occurrence of the specified element, or -1 if the list
does not contain any element. |
|
ListIterator<E> listIterator(int
index) |
It is used to return a
list-iterator of the elements in proper sequence, starting at the specified position
in the list. |
|
boolean offer(E e) |
It adds the specified element as
the last element of a list. |
|
boolean offerFirst(E
e) |
It inserts the specified element
at the front of a list. |
|
boolean offerLast(E
e) |
It inserts the specified element
at the end of a list. |
|
E peek() |
It retrieves the first element
of a list |
|
E peekFirst() |
It retrieves the first element
of a list or returns null if a list is empty. |
|
E peekLast() |
It retrieves the last element of
a list or returns null if a list is empty. |
|
E poll() |
It retrieves and removes the
first element of a list. |
|
E pollFirst() |
It retrieves and removes the
first element of a list, or returns null if a list is empty. |
|
E pollLast() |
It retrieves and removes the
last element of a list, or returns null if a list is empty. |
|
E pop() |
It pops an element from the
stack represented by a list. |
|
void push(E e) |
It pushes an element onto the
stack represented by a list. |
|
E remove() |
It is used to retrieve and
removes the first element of a list. |
|
E remove(int index) |
It is used to remove the element
at the specified position in a list. |
|
boolean remove(Object o) |
It is used to remove the first
occurrence of the specified element in a list. |
|
E removeFirst() |
It removes and returns the first
element from a list. |
|
boolean removeFirstOccurrence(Object
o) |
It is used to remove the first
occurrence of the specified element in a list (when traversing the list from
head to tail). |
|
E removeLast() |
It removes and returns the last
element from a list. |
|
boolean removeLastOccurrence(Object
o) |
It removes the last occurrence
of the specified element in a list (when traversing the list from head to
tail). |
|
E set(int index, E element) |
It replaces the element at the
specified position in a list with the specified element. |
|
Object[] toArray() |
It is used to return an array
containing all the elements in a list in proper sequence (from first to the
last element). |
|
<T> T[] toArray(T[] a) |
It returns an array containing
all the elements in the proper sequence (from first to the last element); the
runtime type of the returned array is that of the specified array. |
|
int size() |
It is used to return the number
of elements in a list. |
Table 5.2: Methods defined in the LinkedList class
The following operations with LinkedList are usually frequent and mentioned below.
· Creating a linked-list
· Traversing a linked-list
· Insertion of an item in a linked-list
· Deletion of an item from a linked-list
All these four operations are discussed with a number of example programs.
Creating
linked lists
Example 5.1:
This program shows how to create an empty linked list and then to store name of a set of cities in it.
import java.util.*;
public class CreateEmptyLLandAddItems
{
public static void main(String
args[]) {
// Creating an empty ll of class LinkedList
LinkedList<String> ll = new LinkedList<String>();
//
Adding elements to the linked list using a number of
add methods
ll.add("Mumbai");
ll.add("Chennai");
ll.add("Kolkata");
ll.add("Delhi");
ll.add("Bangalore");
ll.add("Guwahati");
ll.add("Hyderabad");
// System.out.println("Linked list : " + ll); // Simple printing
// Printing the list using an iterator
Iterator<String> itr = ll.iterator();
while(itr.hasNext()){
System.out.println(itr.next());
}
}
}
Example 5.2:
First, let us consider the declaration and definition of a user defined class Student. This program shows how to create an array of objects of type Students and then add the array into a linked list and then printing the same.
import java.util.*;
//Declaration of a user defined
class
class Student {
String name;
Float marks;
// Constructor
Student(String s, flaot
m) {
name = s;
marks = m;
}
// To parant
a reacord
void printData
() {
System.out.print(“Name : “ + name);
System.out.println(“
Marks : “ + marks);
}
}
// The main class is defined
below.
public class CreateLLofCollection
{
public static void main(String
args[]) {
// Create an aaray of objects
Student sArray =
new sArray[5];
// To store 5 objects
// Create the array sArray
sArray[0] = new Student(“Ram”, 79.6);
sArray[1] = new Student(“Rahim”, 85.5);
sArray[2] = new Student(“John”, 90.1);
sArray[3] = new Student(“Lisa”, 69.4);
sArray[4] = new Student(“Ana”, 59.8);
// Creating a linked-list with sArray
collection
LinkedList<Student> sList =
new LinkedList<Student>(sArray);
Student temp;
// Printing the list using an iterator
Iterator<String> itr = ll.iterator();
while(itr.hasNext()){
temp = itr.next();
temp.printData(); //
Print the current record.
}
}
}
Insertion of elements into a
linked list.
There are many ways that an item can
be inserted into a linked list.
Example 5.3.
This program shows how items can be
inserted at different locations in a linked list. For this purpose, there are
methods like add(), addFirst(),
addLast() are defined in the LinkedList class.
import java.util.*;
public class LLinsertionDemo
{
public static void main(String
args[]) {
// Creating an empty ll of class LinkedList
LinkedList<String> ll = new LinkedList<String>();
//
Adding elements to the linked list using a number of
add methods
ll.add("Mumbai");
// Add an initial item
ll.add("Chennai");
// Add another item
ll.addLast("Kolkata");
// Add at the end
ll.addFirst("Delhi");
// Add at the front
ll.add(2,
"Bangalore"); // Add in the
specific loacation
ll.add("Guwahati");
// Sequential add goes at the end
ll.add("Hyderabad");
// Another sequential insertrtion
// System.out.println("Linked list : " + ll); // Simple printing
// Printing the list using an iterator
Iterator<String> itr = ll.iterator();
while(itr.hasNext()){
System.out.println(itr.next());
}
}
}
Example 5.4.
A sublist
can be inserted into a linked list in adition to a
single item. This program shows how a sublist can be
inserted at different locations in a linked list. For this purpose, the addAll()
method is used.
import java.util.*;
public class InsertSubListToLL{
public static void main(String args[]){
LinkedList<String> ll1=new
LinkedList<String>();
System.out.println("Initial list of elements:
"+ll);
Ll1.add("MP Allahabad");
Ll1.add("MP Lucknow");
Ll1.add("MP Varanasi");
System.out.println("Initia;
list: "+ll);
// Create
another linked list, say ll2
LinkedList<String> ll2 = new
LinkedList<String>();
ll2.add("MLA
Nadia");
ll2.add("MLA
Kharagpur");
//Adding second list ll2 to the
first list ll1
Ll1.addAll(ll2);
System.out.println("After adding ll2 to ll1: "+ll1);
// Create
another linked list, say ll3
LinkedList<String> ll3 = new
LinkedList<String>();
ll3.add("MLA Durgapur");
ll3.add("MLA Howrah");
// Inserrt
ll3 at a specific position of ll1
ll1.addAll(3, ll3); //
Insert ll3 at location 3 of ll1
System.out.println("After insetting ll3: "+ll1);
//Do some normal insertions
Ll1.addFirst("President");
ll1.addLast("Prime Minister");
ll1.add(“MP Chennai”);
System.out.println("The final list "+ll1);
}
}
// Note: Index of a
linked list starts from 0, that is, the first item at location 0
Deletion of elements from a
linked list.
Like insertion, deletion operation on
a linked list can be carried our many ways. Following few examples illustrates
the deletion operation with methods remove(), removeFirst(), removeLast(), etc.
Example 5.5.
This program shows how items can be
inserted at different locations in a linked list. For this purpose, there are
methods like add(), addFirst(),
addLast() are defined in the LinkedList class.
import java.util.*;
public class DeletionFromLL
{
public
static void main(String [] args) {
// Creating a
linked list
LinkedList<String> ll
= new LinkedList<String>();
ll1.add("A");
ll1.add("E");
ll1.add("I");
ll1.add("O");
ll1.add("U");
ll1.add("H");
System.out.println("List of vowels: "+ll);
//Removing specific element from the
linked list
ll1.remove("H"); // Rmovee the vowel H
System.out.println("After deletion of H :
"+ll1);
//Removing element on the basis of
specific position
lll.remove(0);
// This will remove A from the
list
System.out.println("After invoking remove(index)
method: "+ll1);
// Let’s
create another list of semi-vowels
LinkedList<String> ll2=new
LinkedList<String>();
ll2.add("M");
ll2.add("N");
// Adding
new elements to the list of vowels
ll1.addAll(ll2); // Append ll2 after ll1
System.out.println("Updated list : "+ll);
//Removing first element from the
list
Ll1.removeFirst();
System.out.println("After invoking removeFirst() method: "+ll);
//Removing last element from the
list
Ll1.removeLast();
System.out.println("After invoking removeLast() method: "+ll);
// Removing
all elements from ll2
Ll1.removeAll(ll2);
System.out.println("After removing semi-vowels:
"+ll1);
ll1.add(“A”);
ll1.add(”“B”);
ll1.add(“A”);
//Removing first occurrence of
element from the list
Ll1.removeFirstOccurrence("A");
System.out.println("After removing first
occurrence of A: "+ll1);
//Removing the last occurrence of B
ll1.removeLastOccurrence("B");
System.out.println("After invoking removeLastOccurrence() method: "+ll1);
//Removing all the elements
available in the list
ll1.clear();
System.out.println("After invoking clear() method:
"+ll1);
}
}
Traversing a linked list
We have learned
how to print a linked-list in sequential order starting from the first item in
the list. The LinkedList class allow you to traverse a linked in reverse order
as well. For this purpose, you should use the method descendingIterator(). This
can be applied to a list storing of any type of items. The following program
illustrates how to traverse two different type of lists in reverse order, that
is, from the end to the front.
Example 5.6.
import java.util.*;
public class TravserseReverseLL{
public static void main(String args[]){
// Case 1: a linked list of countries
LinkedList<String> lCountries
= new LinkedList<String>();
lCountries.add("Australia");
lCountries.add("India");
lCountries.add("South Africa");
lCountries.add("Zimbabwe");
//Traversing the list of countries in reverse order
Iterator itr1
=lCountries.descendingIterator();
while(itr1.hasNext()) {
System.out.println(itr1.next());
}
// Case 2: a linked list of numbers
LinkedList<Integer> lNumbers
= new LinkedList<Integer>();
lNumbers.add(123);
lNumbers.add(345);
lNumbers.add(567);
lNumbers.add(789);
//Traversing the list of numbers in reverse order
Iterator itr2
= lNumbers.descendingIterator();
while(itr2.hasNext()) {
System.out.println(itr2.next());
}
}
}
Some miscellaneous operations
with linked list
The LinkedList class is loaded with several other
methods like get(), contain(), size(), set(), etc. The following program
illustrates those methods and their utilities in Java programming.
Example 5.7.
import java.util.*;
public class OtherMethodsOfLL{
public static void main(String args[]){
// Creating a
linked list
LinkedList<String> lLetters
= new LinkedList<String>();
lLetters.add("J");
lLetters.add("O");
lLetters.add("Y");
lLetters.add("W");
lLetters.add("I");
lLetters.add("T");
lLetters.add("H");
lLetters.add("J");
lLetters.add("A");
lLetters.add("V");
lLetters.add("A");
lLetters.add(2020);
System.out.println("List : "+ll);
//
Finding an elements in the linked list
boolean status = lLetters.contains("Z");
if(status)
System.out.println("List contains the element 'Z' ");
else
System.out.println("List doesn't contain 'Z'");
// Finding the number of elements in the linked
list
int size = lLetters.size();
System.out.println("Number of letters = " + size);
// Get and set elements from the linked list
lLetters
element = lLetters.get(11);
System.out.println("Element returned by get() : " +
element);
lLetters.set(11, "The fun");
System.out.println("Linked list after change : " + lLetters);
}
}
A linked list with user defined
class
In the following, a program is shown,
which list a number of books, insertion of another books in the list, deletion
of books and then traversing of the books, etc..
Example 5.8.
import java.util.*;
//
Defining a calls Book
class Book {
int accnNo;
String title, author, publisher;
float cost;
// Constructor of the class
Book(int id, String t, String auth, String pub, float val) {
accnNo = id;
title = t;
author = aut;
publisher = pub;
cost = val;
}
}
//
The main class maintaining a library of books
public class LibraryLL {
public static void main(String[] args) {
//Creating list of Books
List<Book> library
= new LinkedList<Book>();
//Creating Books
Book b1
= new Book(101,"Oracle Java","Leslie
Lamport","Oxford",88.5);
Book b2
= new w Book(102,"Complete Java","McGraw
Hill”,94);
Book b3
= new Book(103,"Joy with Java","Samanta","Prentice Hall",69.6);
//Adding Books to list
library.add(b1);
library.add(b2);
library.add(b3);
//Traversing the list
for(Book b:library){
System.out.println(“Book ID: “ + b.accnNo);
System.out.print(b.title+" "
+ b.author+" "+b.publisher+" "+b.cost);
System.out.println();
}
}
}